Information Right Management - SharePoint 2010
Applying Information Right management (IRM) policy to your document library in SharePoint 2010
- Set IRM policy
- Create a SharePoint group and set permission level
- Stop permission inheritance from the parent site
- Allow newly created group to access the document library which you want to apply IRM policy
- Add users to the group

1.
Go to the Document library which you want to apply information Right Management server (IRM server)Click the Library tab
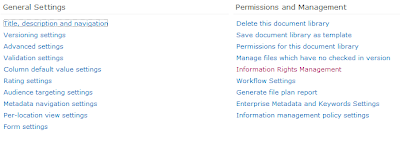
Then you have to click on the Library Settings icon of the Library tab

You can see the following interface under the Library settings
Then select Information Right Management under Permissions and Management which will open IRM Policy creation page


Permission Policy Title: Give a title to identify the policy you will create. (Give a meaningful name for it)
Permission Policy Description: Give a short description to the policy
Allow Users to print documents: If you check this, user can print the documents. By unchecking you can restrict taking printouts of the documents in this document library
Allow users to access content programmatically: By unchecking this, user cannot copy the content by clicking Ctrl+C or using Snipping Tool or using Print Screen or another mechanism
Users must verify their credentials every ____ days: By checking this and set the number of days IRM server checks user credentials every given time period. If you set it as 30days IRM system check user credentials every 30days.
Stop restriction permission to documents in this library on ____: This will allow you to stop restrictions from a specific day
After setting the IRM policy details click OK and save it.
Now again go to Library settings page and select Permissions for this document library under Permissions and Management

2.
You can see the current user groups which are allow to access this document library by inheritance.
In the yellow strip you can see This Library permissions from its parent. (Your site name)
Click on the site name (in my scenario it’s Training Docs), that will redirect to Group settings page which allow you to create User Groups


Click Create Group to create a new SharePoint user group using following steps and set Group Permission as Restricted Read


3.
Then you have to Stop inheriting the permission from the parent site to this document library

4.
Remove other unwanted user groups as you want (Tip: Don’t remove Owner group from the list.)

5.
Now the Newly created user group is ready to add new users. Go to the Group and click Add Users to add new users to the group


Comments
Post a Comment